You can read about all kinds of
things people do to power their hot wire foam cutter including things like running 110V
through a light bulb in series with the foam cutter, battery chargers, dimmer switches,
Variacs, "wall warts", batteries, and so on. There are ways that work, ways that don't, safe
ways, and unsafe ways, okay ways, and better ways.
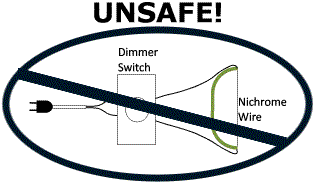
Anytime you have the potential of
applying 110V to your foam cutter, it is unsafe. Using just a dimmer switch or just a
Variac
means that if you turn the knob too far, you can have 110V applied to the wire. If that
happens, you will either burn out your dimmer or Variac or vaporize your wire or both and
that could also cause a fire. In addition, if your were to accidentally touched the wire or
any exposed terminals, connections, or wires on EITHER the input side or output side, you
could get a shock or if the conditions were exactly wrong, you could die from cardiac
arrest. A fuse, circuit breaker, or GFI on the input side might help but will not guarantee
the negative results above.
If you have a low voltage
requirement such as is needed for shorter or thicker wire, you will not be able to get a low
enough voltage with a dimmer switch or Variac anyway. There is a limit to the low voltage
they can put out.
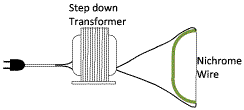
The proper way to power
your foam cutter
is with a
TRANSFORMER
A transformer reduces the voltage
to a lower level so you can't apply line voltage to your foam cutter with the accompanying
hazards. A transformer swaps voltage for current. Most foam cutters take a moderate current
and low voltage. For example, with a 12V transformer, you put in 120V and you get out 12V.
That is a ratio of 120/12 or 10:1. The current is increased 10 fold and the voltage is
reduced 10 fold. If your foam cutter requires 3 amps, then you are only putting in 1/10 of
that or 0.3 amps into the transformer which is slightly more than a 40 watt bulb. The
voltage goes down, the current goes up, no shock potential on the output side of the
transformer or at the nichrome wire,
You can design your foam cutter so
that all you need is the right transformer that puts out the right voltage and is big enough
to output the current you need. (see the Calculator page and the Transformers page. That is
the simplest solution. Note that the green C-shape is representing a bow type foam cutter
with the nichrome wire stretched between the two ends. Any type hot wire foam cutter can use
the same type power supply as the rest of this article describes.
The problem with this overly
simplified design is that it has no protection for the transformer against short circuits
and no way to adjust the voltage (and so the current or amps) so you can't adjust the heat
for the optimum foam cutting temperature. You can calculate the proper wire gauge and length
and it will work fine but if you ever want to change the wire size, wire length, or
temperature, you have no way to change the voltage to match it.
The best design will add a dimmer
switch and fuse, breaker, or GFI to the circuit above and will use the safety ground wire
from the wall plug and attach it to the transformer housing and also to the foam cutter
frame if it is metallic.
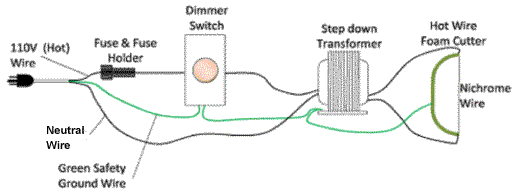
With these components in your
power supply, you have all the necessary features for safe and adjustable features to power
your hot wire foam cutter. The dimmer switch allows you to adjust the voltage from a low
value to the maximum rated output voltage of your transformer, the transformer steps down
the voltage and steps up the current, the fuse protects all your components against
accidental short circuits, and the safety ground connections protects against shock in the
case of a component or wire failure.
Dimmer Switches
There are a lot of different kinds of dimmers and fan controls. First, you don't need a
fan control. You can't use a light dimmer to control a fan because you will damage the
motor but a hot wire foam cutter is most similar to a light bulb -- just a hot wire, but
not hot enough to glow. Fan controls are more expensive because they have additional
circuitry in them. Don't waste the extra money on a fan control.
There are two main
manufacturers of dimmers, Lutron™ and Leviton™. There are many different types of dimmers,
fluorescent, incandescent/halogen, single pole, 3-Way, 600Watt up to 2000 watt, white,
ivory, gold, ganged, rotary on/off, push on/off, combos, etc. Fortunately, the simplest
and cheapest is also the best for hot wire foam cutters. What you want is a 600
Watt, Single Pole, Rotary On/Off dimmer, your choice of white or ivory knob. The
Lutron model number is D-600R-WH (white) or D-600R-IV (Ivory). The Leviton model is 6602-I
(Ivory), 6602-W (White) or 6602-IW (has both colored knobs).
The most common type of dimmer you will find in your local lighting or hardware store
is called a pre-set. What this means is that you can set the amount of dimming and then
leave it there so when you turn the light on or off, you don't disturb the setting. This
is either done with a separate button (used with slider dimmers) or using a push on/off
action (used with rotary dimmers). You likely will not find a rotary on/off at a local
store, they will all be the push on/off style because that is the most popular by far in
the home user market. Jacobs Online offers both types on eBay.
If you use the push on/off rotary type, then you won't be able to tell if your foam
cutter is on or off just by looking at it because the knob switch is a toggle. It is
always out. You push it in to turn it on if it is off, you push it in again, to turn it
off if it is on.
If you use the rotary on/off type dimmer, you know it is off because it is all the way
counterclockwise. It clicks when you turn it off the same as old style radio volume
controls that turned off the radio when you turned all the way to the left. If you knob
has no marks to indicate where it is currently set, you can easily put a mark on it with a
fine tip felt pen or a scratch mark or what ever you want. You won't know where you had it
last but you can also put a mark on the cover plate for your preferred setting so you just
turn it on and turn to line up the two marks.
IMPORTANT: A dimmer does not turn on
until it is turned up to about 50%. After it comes on, you can then turn it down to about
15% or 20% of its full output. It also does not turn on until a certain amount of current
is flowing through it. Just hooking up a transformer to its output does not cause enough
current to flow through it to turn it on regardless of how far you turn the dimmer up. You
MUST have a load on the dimmer. A load is an electrical term for a device that draws
current. You could connect a light bulb to the dimmer or your nichrome wire to the output
of your transformer connected to the dimmer and then the dimmer will turn on. If you only
attach a volt meter or multimeter to the output of the dimmer or transformer but nothing
else, your voltmeter or multimeter will register only a slight voltage. Hook up your
transformer and nichrome wire first and then clip your voltmeter to the two ends of the
nichrome wire and you will read the output voltage. Be sure your meter is set to read AC
voltage.
Adding An Indicator Light And
Separate On/Off Switch
If you are using a push on/off
dimmer, each time you push the knob, you can be changing the preset position a little. It
tends to always be in the clockwise direction for some reason. Of course, if you mark the
optimum position, you can always readjust the knob to the correct position.
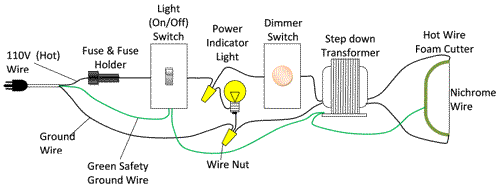
Another enhancement, especially if
you are using the push on/off style dimmer but also just as an enhancement is to add a
separate on/off switch and indicator light as shown below. The first diagram shows the light
between the light switch and dimmer switch. In this configuration, the light will be on full
bright any time you turn the power switch on but will not indicate whether there is power to
the foam cutter or not. The advantage is that if the light is off, you know there is no
power anywhere in the circuit downstream of the switch. That way you can leave the dimmer
switch on and at the desired position all the time and not change it and just turn the power
switch on and off separately.
The indicator light is just a
standard small 110V incandescent bulb. It can be a standard 40 watt bulb or a smaller
wattage appliance bulb or better yet, a night light that uses a small Christmas tree type
bulb. You can add a standard household outlet in a box between the on/off switch and dimmer
switch or you can put both the switch and the outlet in a double box with a combo cover
plate and then just plug the night light into the outlet.
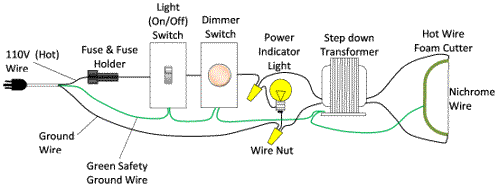
The second configuration shown
below is with the indicator light between the dimmer and the transformer. In this case, the
light bulb will give an indication of the proportion of the voltage going to the
transformer. The advantage is that it shows whether the dimmer switch is on or off which is
handy if you are using the push on/off type dimmer switch. If the dimmer switch is set too
low, it may be hard to see if the light is on at all but in that case, there isn't much
voltage coming out of the transformer, either. You could even put a light in both positions
if you wanted to.
As in the configuration above, you
can add a power outlet and plug a night light into the outlet. In this case, you could put
the dimmer switch and outlet into a double box with a combo plate. This is also handy
because you can then put a standard 110V plug on the input side of the transformer and then
plug that into the second wall outlet. If you wanted to change the transformer later or even
if you wanted to use two separate transformers for different foam cutters, you just unplug
one and plug in the other. You could mount two transformers on the same board with the
dimmer, switches, and outlets.
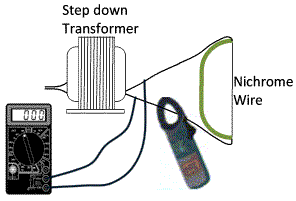
Checking the voltage and/or
current.
You can monitor either the voltage
or the current from the output of the transformer. A clamp on ammeter can be used to check
the current flowing through your foam cutter nichrome wire by clamping it around either of
the wires coming out of the transformer since the output is AC. If you have a panel type
ammeter, you can splice it into one of the output wires. You can check the output voltage by
clipping the alligator clips or touching the test probes to the two output wires.
It would be nice to have both a
digital panel voltmeter and digital panel ammeter mounted in a metal box along with the
other components for a nice self-contained unit but there are two drawbacks. Panel meters,
even analog ones, are expensive. Also, panel meters have only one range so if you are
working in the 1 or 2 amp range, the panel meter would not be the same as one for one in the
10 amp range. It is the same with the voltmeter, if you are working with 3 or 4 volts, it
would not be in the same range as a voltmeter for a 12-24 volt range. Handheld multimeters
and clamp on ammeters have ranges so one instrument can be used for any range.
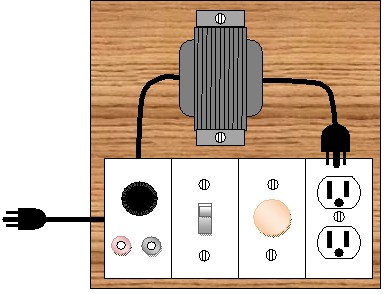
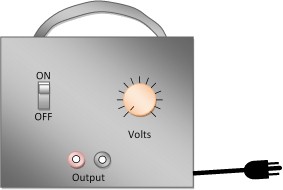
Packaging your Power Supply
You can mount your light switch,
dimmer switch, plug-in for the output from you dimmer switch and your transformer on one
board. You could then put a plug on your input wires (primary) to your transformer and plug
the transformer into one outlet and your power indicator light into the other as mentioned
above and you will have a nice neat package. The diagram below shows banana jacks and a
panel mounted fuse holder in a blank cover plate on the left side. The output from the
transformer goes into the left side and attaches to the banana jacks. The foam cutter would
then be plugged into the banana jacks. The 110V plug and cable also goes into the box on the
left side, the hot side goes to the fuse holder.
You could also mount everything in
a metal box with rubber feet and a carrying handle for an even nicer package. Metal boxes
heavy enough for the transformer can be kind of expensive, though. It is also difficult to
find just the right box. If you Google electrical box or utility box or
device box, you will get the kind of boxes you use in house wiring to
mount switches and electrical outlets into. Google "Project Boxes" to
look for boxes.
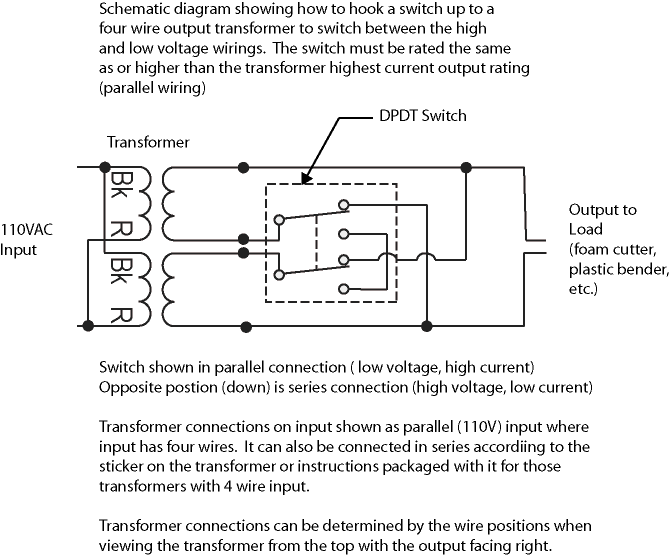
You can also add a DPDT switch to
switch between the low and high voltage outputs for four-wire output transformers.
Here is the schematic for how to wire it.